#1 When mold parting lines cross door lines (or the openings for the trunk or the hood, when they are molded to the body), even when you have sanded the mold line down, small traces may remain in the door lines. To remove these, I use the tip of the Bare-Metal® Scriber to gouge this line away and duplicate the original shape of the valley. Naturally not necessary if you intend to scribe these lines deeper, or to actually cut out the opening piece.
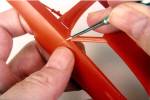
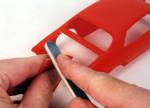
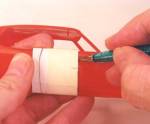
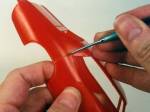
#2 The Bare-Metal® Scriber can be used very effectively to cut out doors and trunk lids (etc.), and more quickly than you would imagine when just thinking about it. Start with a light pressure on the Scriber until you are below the original molded in line. Do a pass equally on all lines so you don't break through the plastic too early. You want the depth of the scribe to be equal on all sides of the opening.
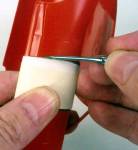
#3 As you can see, the scribe is getting close to breaking through. Also note that all scribes don't appear to be of equal depth. Before proceeding with breaking through the plastic, try to even up the depth of the scribes as best you can.
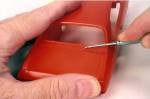
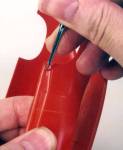
#4 Corners will almost always require a bit more scribing after the regular panel lines have broken through. Turn the model over and finish cutting these corners. You might want to tape the piece being cut out to the body to hold it in place while you do the corners.
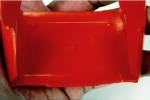
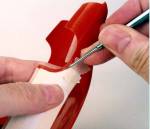
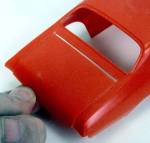
#5 Some light sanding will be necessary to smooth the edges of the opening part and the edges of the body. Do as little sanding as is necessary to make sure the gap between the opening part and the body is not excessive. If the gap is excessive, you will have to do some additional work as described in the text.
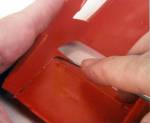
#6 Just add the hinges and then the fun begins as you make up the trunk for the model. Good research material for this is a must, unless you are making a custom. Also remember, making door jambs that look correct is even more fun! The Bare-Metal®Scriber should also be able to cut the panel out of the interior once you have opened the doors, but don't cut the interior door out until you have made the door jambs and know where these fit against the interior.
#7 For the car modeler, converting a 2-door model into a 4-door version requires some research, Original catalogs are a great help, but finding an actual car and taking lots of detail photos is ever better. Also make some sketches of the details, and then take as many measurements for these sketches as the owner of the car allows. You may not get this opportunity again - unless the model you are replicating resides in your own garage. Remember, do not take any measurements unless you get permission from the owner (a cloth measuring tape is best, too, as you are not likely to scratch anything).
#8 Start the conversion to a 4-door by making any modifications necessary to the top. In most cases the side openings for a 4-door are much different than that of a 2-door. In many cases you will have to fabricate an entirely new top, either from scratch, or modified from another model car. This should be done before you start scribing in the new door lines.
#9 Before scribing the new door lines, remove the old door handles. Some builders can cut things like this off a model and reuse them. I am not one of those modelers. The solution is to either buy replacement door handles, or cast your own in resin. Bare-Metal® Foil Co. offers casting kits, and casting this type of part should be very easy. Just be sure you make up several extra sets, and do this before you cut the door handles off!
#10 Tape a piece of cardstock to the door and mark the forward edge of the cardstock on the door using a pencil.
Make a vertical mark on the cardstock and the door to make sure this template can be lined up exactly. Using the reference you have, draw the shape of the door line on the cardstock.
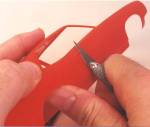
#11 Remove the template and cut out the door line, then tape this back in exact position. Using the template as a guide, VERY CAREFULLY, and with quite light pressure on the Scriber, start scribing a new door line. Until you have a good trench going, keep the template in place. Once you have a good depth, you can remove the template and finish cutting the door line to the depth you prefer. Flop the template and use it for cutting the door line on the other door, measuring carefully to make sure the doors are in the same position on each side of the model.
#12 On this model I extended the bottom of the door line first as it had its own guide line in the rocker panel molding.
#13 The technique for making the template for the back door of this model is different than for the front door. For this door it is easiest if you cut the door shape out first. Keep checking to make sure you have it accurate, then tape this template to the body, and again mark the forward edge in case you have to remove the template - you want to be able to get it in exact position again if necessary.
#14 I scribe the easy cuts first. Then cutout in the roof and the straight cut; then tape the back of the template to the body to better hold it in place. The curved cuts (and corners) are a bit more tricky, but not really all that much more difficult. Just use a very light touch for the first passes until you have a good trench going. Start at one end of the door line and work to connecting with the other. This motion need not be in one stroke - whatever is comfortable for you, one long stroke, or several connected short ones. Just keep working the line until you have the depth of the cut equal to the other lines.
#15 Once the door lines are pretty much at the correct depth, draw the scriber, using light pressure, back and forth along the line, in a "sanding" motion. This will smooth out the scribe a great deal and give the model a more finished look.
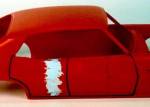
#16 Now you can putty the old back door line (and any imperfections where the Scriber slipped), smooth the putty and paint the model - AFTER you have duplicated these scribes for the other side of the model. It really is easier than you might imagine at the start of the project. The black wash was applied to just show the door lines better. I also scribed the front part of the door lines a bit deeper as this helps the original lines match the new lines you have scribed
#17 Many early plastic kits had door and/or panel lines that were raised rather than recessed. It was much easier for a manufacturer to tool this type of line, but it sure didn't look authentic. To scribe these lines in, first make a pattern. Tape a piece of paper over the panel, making it large enough so you can include things like wheel openings in the pattern, for lining up the template later. Using a pencil, rub over the raised panel lines to create a good outline on the paper pattern. Do this for all the opening lines on the model.

#18 Remove the pattern and cut the opening out of it, along with things like the wheel openings to line the template up on the body. Once you have the paper pattern cut to the exact shape, transfer the shape to cardstock. Make sure it all lines up correctly. Now, sand the raised line smooth and tape the pattern in position on the body. Now you just carefully scribe in the correct line as described before. This will sure look a lot better than the old raised lines for the opening parts!